
Crochet Christmas Wreath: Easy Free Pattern for Your Front Door
Free crochet Christmas wreath pattern for beginners: a 12-inch door wreath with holly leaves, berries and a bow, plus a quick mini wreath ornament.
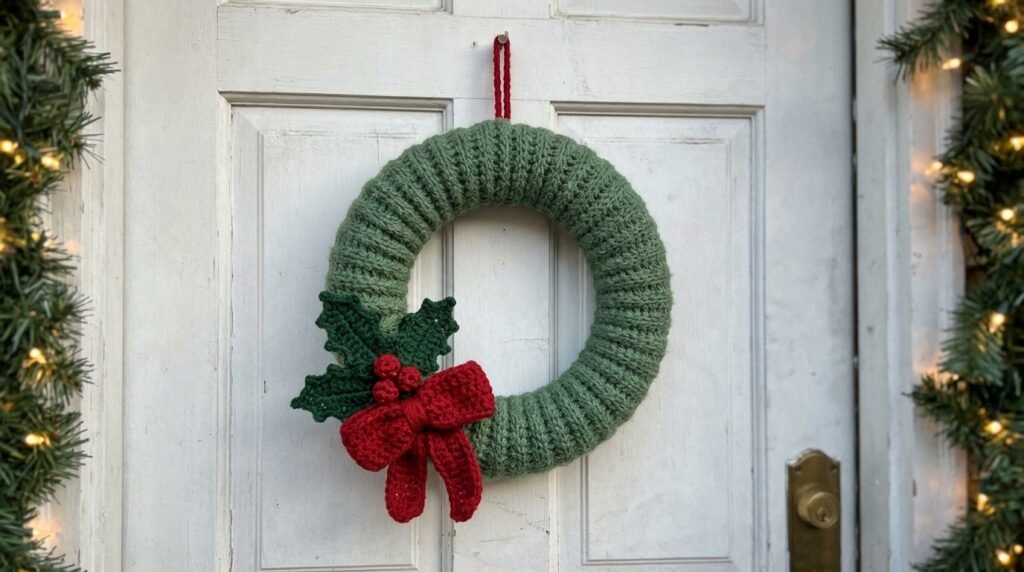
A store-bought wreath looks nice for a season. A crochet Christmas wreath comes out of the storage box every December looking exactly like the day you made it: soft, a little bit cozy, and completely yours. It’s also one of the most forgiving holiday projects you can pick, because the main part is nothing more than a long strip of simple stitches wrapped around a foam ring.
In this guide you’ll find a complete free pattern for a 12-inch door wreath (ribbed green wrap, holly leaves, berries and a bow), a quick mini wreath ornament you can finish in under an hour, plus yarn amounts, color ideas and the fixes for the problems that trip up most first-timers. Everything is written in US crochet terms.
What’s in this guide
- Crochet Christmas wreath at a glance
- Supplies: yarn, hooks and a wreath form
- Stitches and abbreviations (US terms)
- Free crochet Christmas wreath pattern, step by step
- How to crochet holly leaves and berries
- How to assemble and hang your wreath
- Mini crochet wreath ornament (beginner, under 1 hour)
- Crochet wreath ideas and color variations
- Common mistakes and how to fix them
- FAQ
Crochet Christmas wreath at a glance
- Finished size: about 12 inches across (fits a standard 12-inch foam wreath form)
- Skill level: easy. If you can chain, half double crochet and single crochet, you can make this
- Time: plan on a weekend: roughly 4 to 5 hours for the wrap, 1 to 2 hours for leaves and berries, and about an hour to assemble
- Construction: a ribbed strip worked flat in rows, sewn around a foam ring, then decorated with crochet holly leaves, berries and a bow
- Terms: US crochet terms throughout
The wreath uses the same stitch you’d use for a scarf, so if you’ve made our simple half double crochet scarf, you already know the hard part.
Supplies: what you need to crochet a Christmas wreath
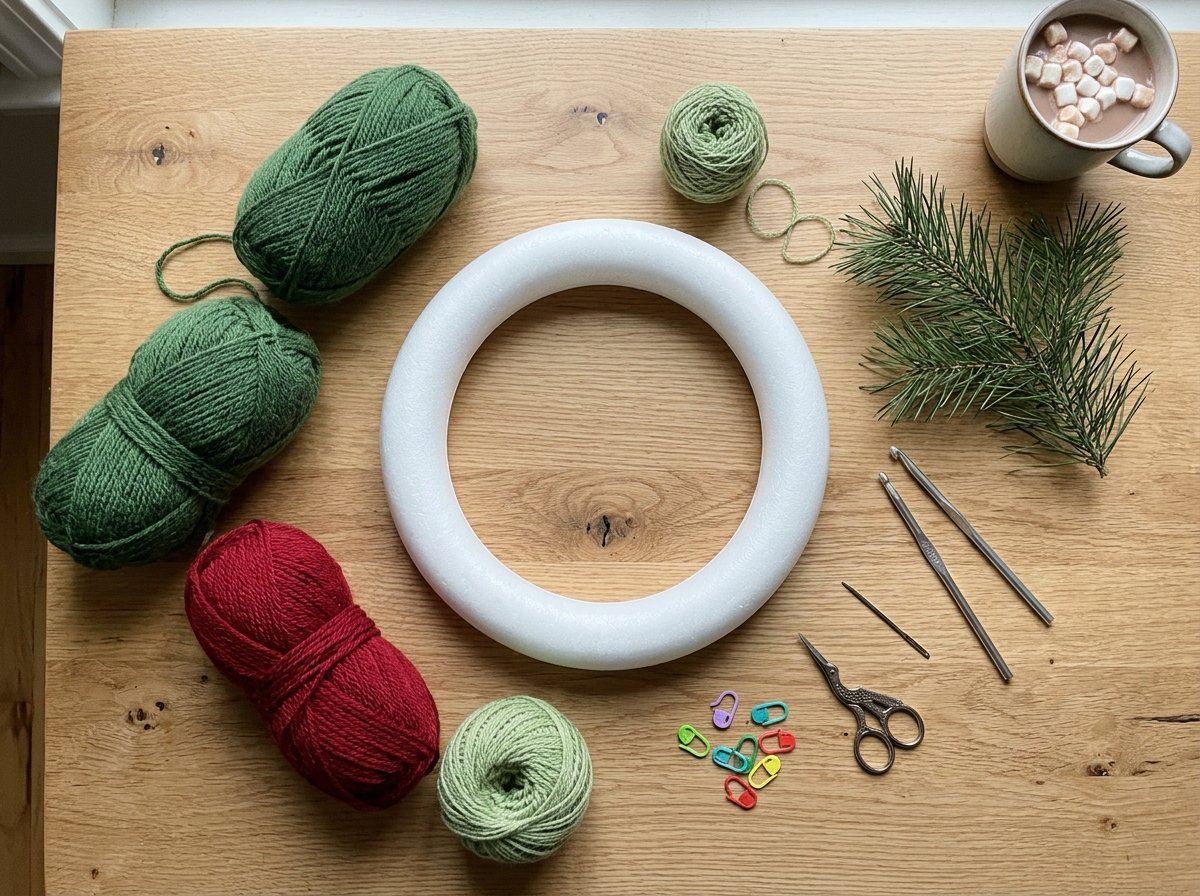
Yarn
- Main green (wrap): worsted weight (#4) acrylic in a forest or pine green, about 250 yards. One large 7-ounce skein usually covers the wrap with some left over for leaves
- Leaf green: worsted weight (#4) in a second, darker or lighter green, about 50 yards. Two greens make the leaves stand out against the wrap
- Red: worsted weight (#4) for berries and the bow, about 30 yards
Acrylic is the best choice for a door wreath: it holds its color, shrugs off a bit of damp air and doesn’t attract moths in storage. Cotton works too, but it’s heavier and shows dust more. Yardages are generous estimates so you don’t run short halfway around the ring.
Hooks and notions
- 5.0 mm (H-8) hook for the wrap
- 4.0 mm (G-6) hook for leaves and berries. A smaller hook makes firmer leaves that hold their points
- 12-inch foam wreath form (a straw form also works and gives a slightly chunkier wreath)
- Tapestry needle, scissors and a few stitch markers
- A small handful of fiberfill for the berries (or just stuff them with yarn tails)
- Optional: hot glue for anchoring the decorations to the wrap, and a wreath hanger or a length of ribbon
Stitches and abbreviations (US terms)
- ch – chain
- sl st – slip stitch
- sc – single crochet
- hdc – half double crochet
- dc – double crochet
- BLO – back loop only
- MR – magic ring
- sc2tog – single crochet 2 stitches together (decrease)
- picot – ch 3, sl st in the 3rd ch from the hook
Want a refresher? Our half double crochet guide covers the main stitch in detail, and the crochet abbreviations cheat sheet shows every term with its UK equivalent.
Free crochet Christmas wreath pattern, step by step
Step 1: Measure your wreath form
Foam forms vary a little between craft stores, so take two quick measurements with a soft tape before you start:
- Around the tube: wrap the tape around the foam itself, like a bracelet. On most 12-inch forms this is about 6 to 6.5 inches. This is the width of your strip.
- Around the middle of the ring: measure the circle running along the center of the tube, halfway between the hole and the outer edge. On a 12-inch form this is usually around 30 inches. This is the length of your strip.
Step 2: Crochet the ribbed wrap
Use your main green and the 5.0 mm hook. The strip is worked in short rows of hdc through the back loop only, which creates raised ridges and, more importantly, gives the fabric a lot of stretch in length. That stretch is what lets one strip hug both the small inner circle and the larger outer circle of the ring.
Foundation: Ch 23.
Row 1: Hdc in the 3rd ch from the hook and in each ch across. Turn. (21 hdc)
Row 2: Ch 1 (does not count as a stitch), hdc BLO in each st across. Turn. (21 hdc)
Rows 3 and on: Repeat Row 2 until the strip measures your middle-of-ring measurement when laid flat without stretching. For a typical 12-inch form that’s about 30 inches, or roughly 75 rows at a standard worsted gauge.
Leave a tail of about 40 inches when you fasten off. You’ll use it to sew the long seam.
Adjusting the width: 21 hdc is about 6 inches in worsted yarn. If your tube measures more, add 2 chains to the foundation for every extra half inch. The strip should be about a half inch narrower than the tube so it pulls snug when you sew it. A strip that’s too wide wrinkles and shows gaps.
Step 3: Wrap and seam the strip
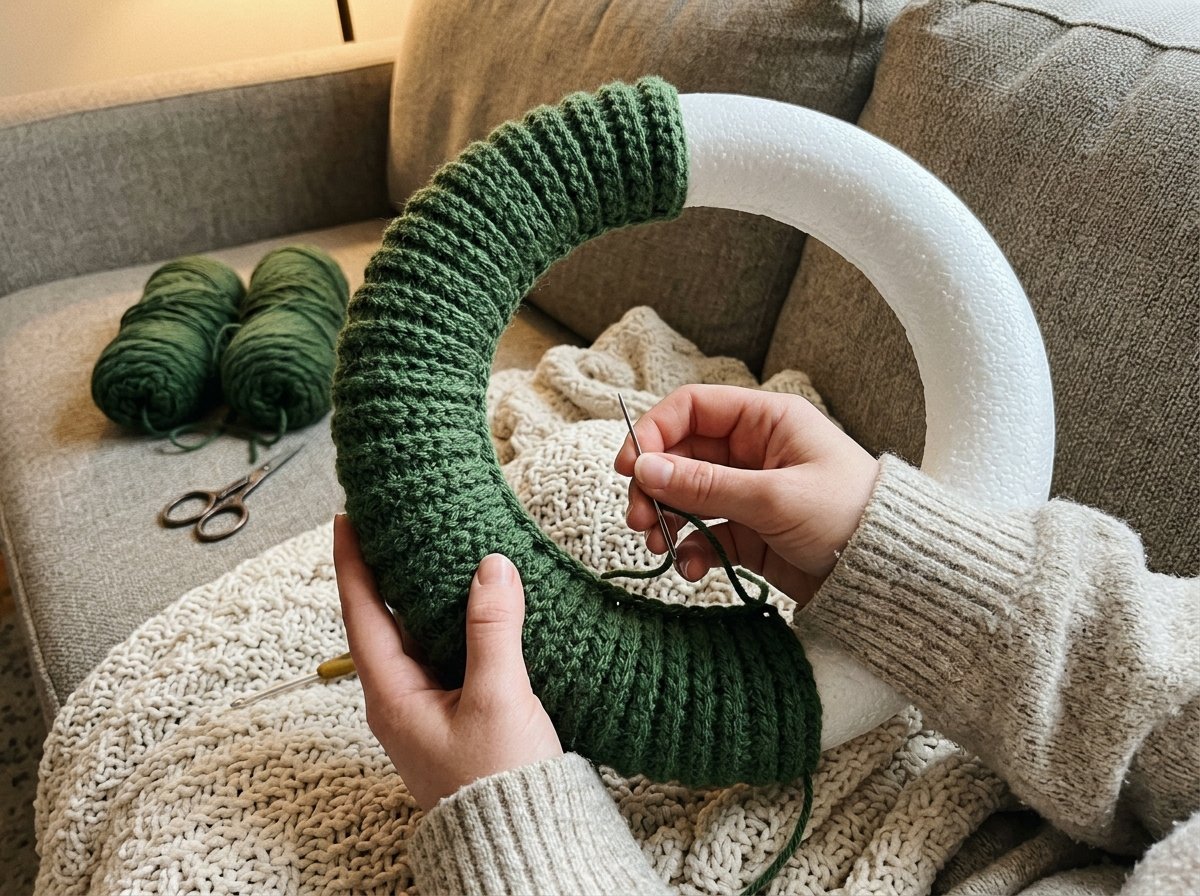
Lay the strip over the ring so the ridges run across the tube, like stripes on a candy cane. Start at the top of the wreath, fold the long edges toward the back and whip stitch them together on the back side with your tail, working a few inches at a time and sliding the fabric around the form as you go. Pull each stitch just snug enough that the edges meet; you’re closing a seam, not drawing a bag shut.
The fabric will gather a little around the inner hole and stretch a little around the outside edge. That’s normal and is exactly why the ribbing matters. When you get back to the start, sew the two short ends together, weave in the tail and give the whole wreath a gentle squeeze to even out the ridges.
Tip: keep the seam slightly toward the inner back of the ring rather than dead center. It disappears completely once the wreath is on the door.
How to crochet holly leaves and berries
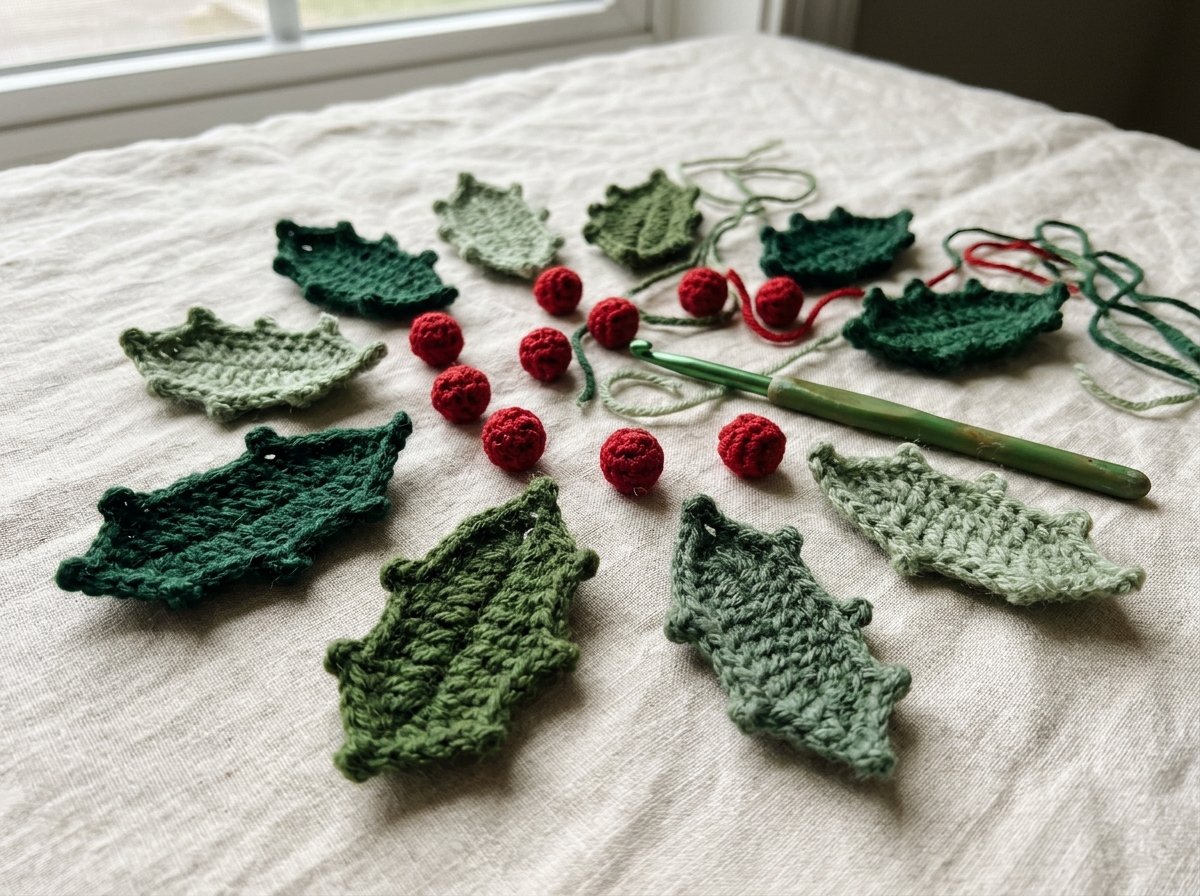
Holly leaves (make 9 to 12)
Use the leaf green and the 4.0 mm hook. Each leaf is about 3 inches long and is worked along both sides of a short chain.
Ch 10.
First side: starting in the 2nd ch from the hook, sl st, sc, hdc, dc, picot, dc, dc, picot, hdc, sc, then 3 sc in the last ch (this is the leaf tip).
Second side: rotate and work along the other side of the foundation chain: sc, hdc, dc, picot, dc, dc, picot, hdc, sc, sl st in the last ch.
Fasten off with a 6-inch tail for sewing.
The picots make the little points that read as holly from across the room. If your leaves curl, steam them lightly with an iron held above the leaf (don’t press acrylic directly) and let them dry flat. For a mix of shades, make half the leaves in your wrap green and half in the leaf green.
Berries (make 5 to 9)
Use red and the 4.0 mm hook. These are tiny amigurumi balls, worked in continuous rounds.
Rnd 1: 6 sc in MR. (6)
Rnd 2: 2 sc in each st around. (12)
Rnd 3: sc in each st around. (12)
Rnd 4: sc2tog 6 times. (6)
Stuff with a pinch of fiberfill or your starting tail, then fasten off, weave the tail through the front loops of the last 6 stitches and pull closed. Leave the tail for attaching.
New to the magic ring? Our amigurumi for beginners guide walks through it with photos. Odd numbers of berries (3, 5 or 7 per cluster) look the most natural.
The bow
With red and the 5.0 mm hook, ch 9. Sc in the 2nd ch from the hook and across (8 sc), then work rows of sc until the piece is about 7 inches long. Fasten off. Make a second, shorter strip of about 4 inches for the tails. Wrap a length of red yarn tightly around the middle of the long piece several times to pinch it into a bow shape, then tie it over the center of the tails strip and trim the tail ends into a V. Prefer a quicker finish? A real velvet ribbon bow looks lovely against crochet too.
How to assemble and hang your wreath
- Plan the layout first. Lay the wreath flat and arrange the leaves and berries before sewing anything. The classic look is one cluster at the lower left or bottom center; a full ring of leaves looks great too if you make 18 to 24.
- Layer the leaves. Fan 3 leaves out from a central point, tuck 2 or 3 more underneath at angles, then place the berries in the middle where the stems meet.
- Attach. Sew each piece on with its tail, going through the wrap fabric (not around the whole form) so the stitches stay hidden. If you want extra security, add a small dot of hot glue under each leaf base.
- Add the bow at the bottom or the top, slightly overlapping your cluster so everything looks connected.
- Make a hanging loop. At the top back, join green with a sl st, ch 20 and sl st back into the same spot to form a loop. Reinforce it with a second chain loop. Or skip the loop and use a ribbon tied around the top.
Hang it with an over-the-door wreath hanger or an adhesive hook. A 12-inch foam wreath with crochet wrap is light, so it won’t scratch or weigh down your door.
Mini crochet wreath ornament (beginner, under 1 hour)
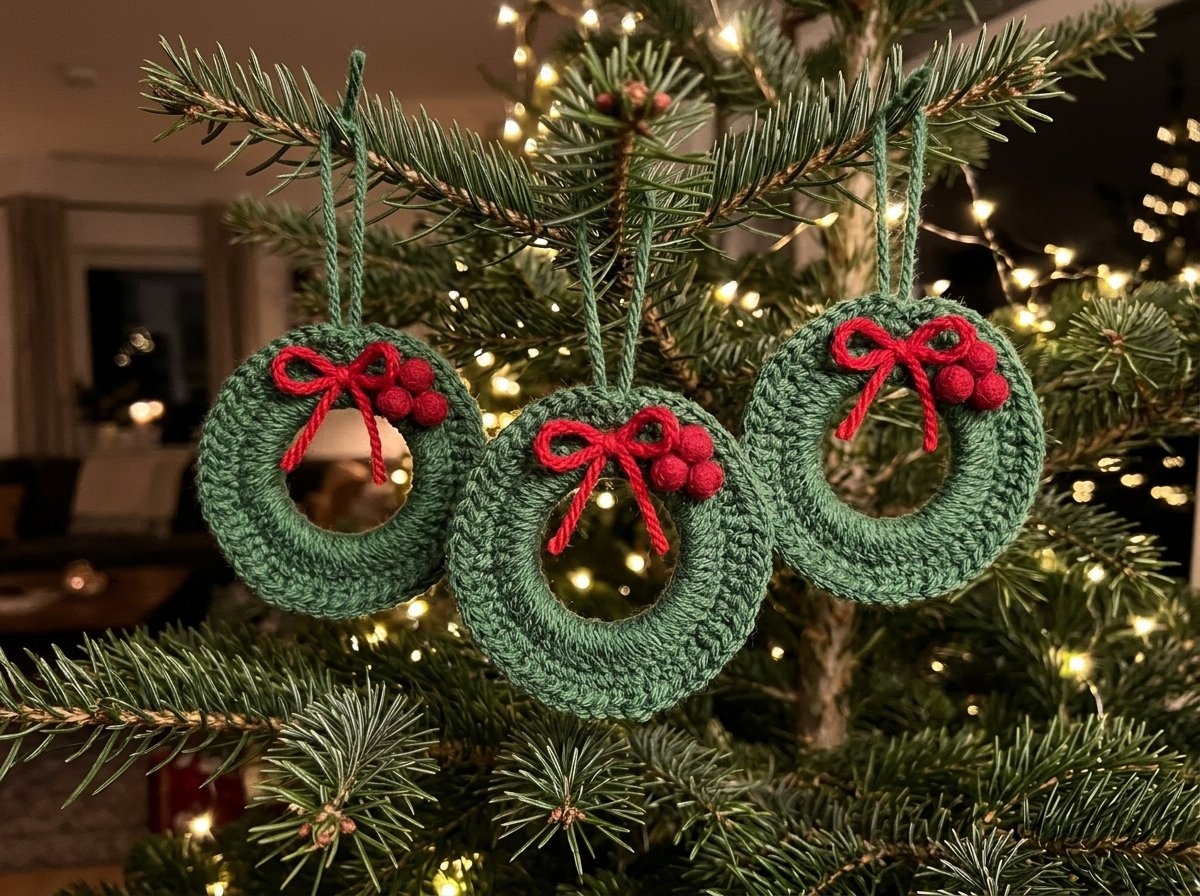
If you want something faster, or you’d like a set to tuck into gift bags, this ornament version is the one. It uses a ring as a base, so it holds its shape perfectly without stuffing.
You need: a 3-inch metal or wooden craft ring, about 20 yards of green worsted yarn, scraps of red, and a 4.0 mm hook.
Rnd 1: Make a slip knot on your hook. Insert the hook through the ring, yarn over and pull up a loop, yarn over and pull through both loops (sc worked over the ring). Keep working sc over the ring, pushing stitches together as you go, until the ring is fully covered with no gaps. That’s usually 45 to 55 sc for a 3-inch ring. Sl st to the first sc.
Rnd 2: Ch 3, 2 dc in the same st, then 3 dc in each sc around. Sl st to the top of the ch 3. Fasten off.
The packed double crochets ruffle and twist naturally, which gives a full, leafy look. Sew on 3 tiny berries (the berry pattern above, or French knots in red) and a little bow made from a 6-inch chain tied in a knot. Add a ch 15 loop for hanging.
These look sweet hung next to our crochet snowflake ornaments and mini crochet Christmas trees, and they’re a perfect addition to a batch of quick crochet gifts.
Crochet wreath ideas and color variations
Once you’ve made one, the same strip-and-ring method works for every season and every style. A few ideas:
- Scandi winter: cream or white wrap, sage green leaves and no berries. Add a few crochet snowflakes instead of holly.
- Candy cane stripes: work the wrap in 4-row stripes of red and white. Skip the leaves and finish with a big red bow.
- Rustic farmhouse: oatmeal wrap, olive leaves, deep burgundy berries and a burlap ribbon bow.
- Fall wreath: mustard, rust and brown stripes with crochet leaves in autumn colors. Swap the decorations in December and keep the same wrapped form.
- Character wreath: tuck a small crochet friend like our crochet Christmas gnome into the bottom of the ring for a whimsical focal point.
- Wreath coasters: crochet a flat ring of hdc rounds in green, add one or two tiny berries and you have a matching set of coasters for holiday mugs.
Prefer a printable, tested pattern with photos for every round? Browse the seasonal crochet patterns in the Yarvella pattern shop.
Common mistakes and how to fix them
The foam shows through
Your strip is too wide (so the edges don’t pull snug) or your hook is too big for your yarn. Remove a few stitches’ width, or go down a hook size and work a tighter strip. As a quick fix, you can paint the foam green with craft paint before wrapping, or wrap it in green tissue paper first.
The wrap twists or spirals around the ring
This happens when the seam drifts as you sew. Pin the strip in 4 or 5 places around the ring with sewing pins before you start seaming, then sew from pin to pin.
The strip ends up too short
Don’t stretch it to make it fit; you’ll get gaps on the outside edge. Just add a few more rows. That’s the advantage of seaming the short ends last.
The holly leaves curl into tubes
Leaves curl when the stitches are tight on one side. Use the same tension on both sides of the chain, and steam-block the leaves. If you notice curling in your other projects as well, our guide to why crochet curls and how to fix it goes into the causes.
The berries look like flat discs
Make sure you work Round 3 (the plain round) before you decrease, and stuff firmly. For a tiny, very round berry, use a 3.5 mm hook.
Everything looks scattered
Cluster your decorations. Three small groups or one generous cluster reads as intentional; leaves spaced evenly all the way around can look sparse unless you make a lot of them.
Crochet Christmas wreath FAQ
Is a crochet Christmas wreath good for beginners?
Yes. The wrap is just rows of half double crochet, and the leaves and berries use basic stitches. If you’ve finished a scarf or a dishcloth, you have every skill you need.
How much yarn do I need for a crochet wreath?
For a 12-inch wreath, plan on about 250 yards of worsted weight yarn for the wrap, 50 yards for leaves and 30 yards for berries and the bow. A mini 3-inch ornament takes about 20 yards.
What do you put inside a crochet wreath?
Most crochet wreaths are built over a foam or straw wreath form from a craft store. For ornaments, a metal or wooden ring works best. You can also crochet a tube and stuff it with fiberfill, but it won’t hold a perfect circle as well as a form.
How long does it take to crochet a Christmas wreath?
The full 12-inch door wreath is a weekend project for most people, roughly 6 to 8 hours in total. The mini ornament version takes under an hour.
Can I hang a crochet wreath outside?
On a covered porch, yes. Acrylic yarn handles cold and dry air well. Avoid spots that get rain or snow directly, since wet yarn gets heavy and foam forms can absorb water.
What are some easy crochet Christmas decoration ideas besides a wreath?
Mini wreath ornaments, snowflakes, small trees, gnomes and stockings are all quick and beginner friendly. Our crochet Christmas stocking pattern is a great next step after this one.
Which crochet stitch uses less yarn for a wreath?
Taller, more open stitches cover area faster with less yarn, so hdc and dc use less yarn per inch than tight single crochet. That’s one reason this wrap uses hdc: it covers the form quickly while still looking full.
How do I store a crochet wreath after Christmas?
Store it flat or hanging in a breathable bag or a box lined with tissue paper. Don’t crush it under heavier decorations, and add a cedar block if you made it with wool.
Make it once, hang it every year
A crochet Christmas wreath is the kind of project that pays you back every single December. Start with the ribbed wrap this weekend, crochet the holly leaves in front of a holiday movie, and you’ll have a handmade wreath on your door before the first party invitations arrive. Then make a few mini wreath ornaments for friends, because once people see yours, they’ll ask.
If you make one, we’d love to see it. Tag Yarvella Crochet and show us your colors.
Keep making

Easy Crochet Christmas Ornaments: 5 Free Beginner Patterns
Make 5 easy crochet Christmas ornaments: a candy cane, bauble, star, mini hat and holly, with free beginner patterns in US terms, tips…
Read the guide
Gifts for Crocheters: 30 Ideas They’ll Actually Use (by Budget)
The best gifts for crocheters, sorted by budget: ergonomic hooks, yarn tools, project bags, stocking stuffers and handmade ideas, plus how to buy…
Read the guide